Friday, June 29, 2012

Totally Terrific Tees!

I'm more of a jeans and T-shirt kind of girl.
~Tara Reid


This was a pretty fun and inexpensive craft, although truth be told, I did most of the work.  Maddie, however, did choose the graphics.

At any craft store in North America, one can find printable iron on material. I use Avery brand. It's the most widely available and probably the cheapest (and it comes with a boxtop for education for your school.  Bonus). Using an ink jet printer, you find a graphic you like and print it directly to the paper.  After that you can iron the image onto a shirt, tote bag, blankets (they make great customize quilt fabric squares).

The tee-shirts are available at most craft/fabric stores.  I bought ours at A.C. Moore for about $3.00 a shirt and bought a few in case we messed up (which I did).  The Inkjet fabric transfers cost us $8.50.  It comes with six sheets so if you mess up (which I did), you have extra to work with.


Step One: Find a graphic.  This is pretty easy.  Google image search will do the trick. You can scan pictures of loved ones, pets, or friends if you prefer making it a more personal item.  This is also a fast and easy gift for Mother's Day, Father's Day, Grandparent's Day, birthdays, and Cupcake Day.  Anything goes. I think it's best to insert the image into a Microsoft Word program.  That way you can get it to the right size and see how it will print.  I don't have any  real graphics program, but if you want to use one of these, go for it.

Step Two: Print the image on the transfer paper. Make sure you put the paper in the printer the correct way.  Put your printer settings for "best quality" and photo on "plain" or "other" paper.  The paper feeds pretty easily.  When it's finished, give it a bit of time to dry before you start.  We just watched The Fellowship of the Ring, so Maddie was hot to make a Galadriel tee-shirt.  Make sure if there is any text on the graphic that you use a program and mirror the image before you print it.  The image is going to transfer backwards from what you see.

Step Three: When the images are dry, cut them out carefully.  The pack says to give it a little bit of white boarder.  I didn't and it didn't hurt.  I guess they just want to make sure you can grip it properly when you start to peel.  Your choice.


Step Four: (Obviously for the adult!) Set your iron to the highest cotton setting and TURN OFF THE STEAM.  This is a dry transfer.  Steam will mess up the transfer (nope...this wasn't one of my mistakes).  While your iron pre-heats, place a towel on your ironing board. Don't choose any with any relief patterns that might cause unexpected creasing (nope, that wasn't the mistake either).  Place your tee-shirt squarely on the board and CENTER the image properly.  DING DING DING!  Mistake number one! Boy was my mistake a doozy.  It was terribly crooked.  Maddie said she's wear it that way, and until I made my second mistake, I thought I might let her. Make sure your image is right side up.  DING DING DING!  Mistake number two.  I peeled off the paper to reveal one seriously upside One Ring poem.  I couldn't excuse my way out of that one.  I chucked the whole shirt and started again.

Step Five: Ironing!  Hold your pattern by the corner so it doesn't move when you put the iron down for the first time.  Once it goes onto the transfer paper, it won't move.  Using sliding motions and a little pressure, move your iron back and forth without letting it settle on one spot for any extended period of time. The pack says about 45 seconds.  That sounds pretty fair.  Once you are finished let it alone for five or more minutes and allow the shirt and transfer to cool.  If you try and peel it when it's still warm it will pull up.


Step Six: Peeling!  Carefully pull up a corner of the transfer paper.  Slowly pull it away from the tee-shirt.  If any of the image stays on the transfer paper, but it back down and re-iron the spot. Once it's peeled away and your tee-shirt is complete, throw it in the wash to set the image permanently.  Use cold water and either hand it outside to dry or use a cool to medium dryer setting.

Voila!


You really want to see the messed up shirt, don't you. OK.

Very crooked. Ugh.
˙ןןɐ ɯǝɥʇ ǝןnɹ oʇ buıɹ ǝuo

Thursday, June 28, 2012

The Littlest Mermaid

"Most Hobbits regarded even rivers and small boats with deep misgivings...and not many of them could swim."
~J.R.R. Tolkien, The Fellowship of the Ring 


OK, so my daughter isn't a Hobbit now, but she certainly started out that way.  Here's a picture of her as a baby....
She hated the pool.
But lately she's a bit of a mermaid.  Today we went to the city pool.  It was well worth the total $9.00 we paid ($5.50 for me and $3.50 for her).  The season pass is definitely worth purchasing, but unfortunately I didn't think to budget it in.  For adults it's $75.00 and $35.00 for kids.  Believe me, I'm buying one next year.

Today we spent two and a half hours in the pool.  It was fun and it was physical activity...something kids don't get much anymore.  When I was a kid we were were out playing kickball on the block corners, and running around like fools.  Today?  Kids sit in front of the TV either watching mindless programs or playing video games (which I'm pretty sure in large doses causes some form of brain damage along with obesity, social ineptitude, and exposure to violence...I guess you noticed I am NOT a fan of video games).  

How things change...

A Note on Drowning and Water Distress


The most important tip ever.  Drowning does NOT look like it does in movies.  No splashing, holding up fingers counting one..two...three as the victim bobs up and down, and victims do not scream "HELP!" I know you'll be looking out for your own child, but always be aware of other little ones in the pool.  The following information is from Mario Vittone's Website

  1. Except in rare circumstances, drowning people are physiologically unable to call out for help. The respiratory system was designed for breathing. Speech is the secondary or overlaid function. Breathing must be fulfilled, before speech occurs.
  2. Drowning people’s mouths alternately sink below and reappear above the surface of the water. The mouths of drowning people are not above the surface of the water long enough for them to exhale, inhale, and call out for help. When the drowning people’s mouths are above the surface, they exhale and inhale quickly as their mouths start to sink below the surface of the water.
  3. Drowning people cannot wave for help. Nature instinctively forces them to extend their arms laterally and press down on the water’s surface. Pressing down on the surface of the water, permits drowning people to leverage their bodies so they can lift their mouths out of the water to breathe.
  4. Throughout the Instinctive Drowning Response, drowning people cannot voluntarily control their arm movements. Physiologically, drowning people who are struggling on the surface of the water cannot stop drowning and perform voluntary movements such as waving for help, moving toward a rescuer, or reaching out for a piece of rescue equipment.
  5. From beginning to end of the Instinctive Drowning Response people’s bodies remain upright in the water, with no evidence of a supporting kick. Unless rescued by a trained lifeguard, these drowning people can only struggle on the surface of the water from 20 to 60 seconds before submersion occurs.
(Source: On Scene Magazine: Fall 2006 (page 14))
This doesn’t mean that a person that is yelling for help and thrashing isn’t in real trouble – they are experiencing aquatic distress. Not always present before the instinctive drowning response, aquatic distress doesn’t last long – but unlike true drowning, these victims can still assist in their own rescue. They can grab lifelines, throw rings, etc.
Look for these other signs of drowning when persons are in the water:
  • Head low in the water, mouth at water level
  • Head tilted back with mouth open
  • Eyes glassy and empty, unable to focus
  • Eyes closed
  • Hair over forehead or eyes
  • Not using legs – Vertical
  • Hyperventilating or gasping
  • Trying to swim in a particular direction but not making headway
  • Trying to roll over on the back
  • Appear to be climbing an invisible ladder. 
  •  
Pool tips!

1.  Take the time to both play and teach your little one some pool safety.  No running. No serious horseplay (Please teach them NOT to dunk others.  Seriously...can you name one single person that likes to be dunked?). Teach them to back float and how to hold their breath if their head goes under.  I'm no instructor, but forcing bubbles out of their noses means water isn't going in their noses.  Make sure you point out the lifeguards and how to identify them.  At Cedar Beach, the lifeguards wear red suits, sit in the high chairs watching over the pool, and hold a long lifesaving red float.

2.  You can get lots of blow up toys like inner tubes, beach balls, and floaty wings at the Dollar Store.  Just remember, these toys aren't life saving devices.

3. Pack a nice picnic lunch.  I learned this the hard way.  Cedar Beach has a little cafe, but as far as I could tell, the hot dog buns were bought in 1931.  The only thing the cafe is good for is candy and sodas.  Sandwiches and snacks are best brought in a cooler, and shared with your group.

4.  Take breaks every hour and apply sunscreen, sunscreen, sunscreen (a good time to do this is when you eat lunch).  Skin cancer is nothing to fool with.  Put your sunscreen on before you leave for the pool when your skin is dry.  That way it can soak into your skin properly.  Reapply often (about once an hour or so).  Dry your skin before you put more on.  If you rub sunscreen on while you are wet, it washes off when you get back into the pool.  While we're on the sun protection subject, hats, sunglasses, and sitting under the trees are also helpful.  You know very well what a sunburn feels like. Don't subject your child to the same kind of pain.

5. Remember to bring goggles and water shoes!


HAVE FUN!  STAY SAFE!

Tuesday, June 26, 2012

Our Fairy House Part Two

Today was construction day!  We gathered our supplies.  These were the basics.  Throughout the construction I was always sending Maddie to "get more sticks!"

A nice pile of supplies

The first part was the wall.  I wanted to do three walls like a little lean-to, but we have heavy clay soil, and it was difficult to push the sticks into the ground.  I decided on only one upright stick wall. I'll get to the other walls in a minute.  The sticks were wobbly when I did get them into the ground, so I had to improvise and use some fresher dead vines (not cut by me...) and try and braid it into a rope to tie them together.  Thank you Dave Canterbury and Cody Lundin of Dual Survival!  (Discovery Channel show that aside from a few bleeps, is awesome for kids).  That show taught us how to make rope from vines.

The start of a wall
Maddie came up with the idea for the roof.  We had the house set under a large branch, so Maddie just decided to pile sticks up across the expanse.

The beginning of the roof
We were very fortunate to have rude squirrels and a naughty skunk.  They dug up the ground and pulled up moss.  We were able to harvest the dead moss to cover the roof sticks.  Maddie was happy there was moss because it soaks in rain (again, thank you Dave and Cody!).

Covering the roof with moss.  Not complete yet.
Next Maddie worked on the inside. She found flat bark that she laid down as a little carpet.  Using the river stones we found she made a little bed.  She used a nice piece of moss for the mattress, a lovely oak leaf for a blanket and another chunk of moss for the pillow.


Our very naughty squirrels often chew branches for next bedding.  A lot of the time they drop them onto the ground.  I was able to use big branches of dried oak leaves for the back wall.  For the left wall we just piled up sticks and used a few fresh vines to weave them together lightly.  Inside to the left of the bed is a table and two chairs with an acorn meal ready to serve.  A few more river stones by the right wall for stability and we were done!


There's Maddie with her new fairy house!  We have a lot more room under that branch so I think a few additions might be in the future.


Take a look at Dual Survival.  It has some wonderful survival tips.  You never know when you might need them.  You can get full episodes on the website.

Monday, June 25, 2012

Our Fairy House Part One


This is going to be a post in a few installments.  The fairy house we're planning needs to be done in stages.  This is a fabulous craft for kids because it combines creativity, literature (it's a good time to read J.M. Barrie's Peter Pan), and a little bit of exercise as you walk around your neighborhood or a park to collect materials.  If you have boys, this craft could easily be a Gnome House. 

There are rules to making your fairy house that need to be followed.  If you don't want to follow the rules, it really won't be a legitimate fairy house.

1.  ALL materials must be natural, not man-made.  That means that even if the materials are natural in origin, if a human constructed it, it's off limits.  You can't use hemp twine.  Hemp in natural, but unless you make the twine yourself (which of course you can!), you can't use it.

2. You cannot use living things. You can't pull leaves off trees.  You can't pull branches off of trees (you can use dead branches that have been left from pruning). You can't rip moss off a tree.  You can't pick flowers.  You can't pull off vines.  It has to be dead fall sticks, moss, dried leaves (fresh if they have just fallen off a tree), pinecones, shells, stones, etc...

3.  Be creative!  Need some sort of glue?  Use tree sap or mud.  Need string, use dead vines and braid them.

The best place to make houses is in your yard if you can.  But, since you are using only natural elements, you can make them in parks, or in other natural settings (beaches, river areas, forests, etc...). Imagine how fun it would be for a little boy or girl walking in a park to stumble upon your fairy house! Find a little space that's tucked in.  Little area under brush and inside trees are the best. I was lazy this year and left a tree trimming in my yard.  I should have cut it down and either mulched it or sent it along with the other yard waste, but I didn't.  And I'm glad I didn't.  We'll be using this to tuck in our fairy house.


Finding Supplies
 
Make sure you take a basket or a bag with you.  Since this is a very green project, take a reusable grocery bag as opposed to a plastic bag.  Maddie likes to take a natural woven basket.  Basket's are also pretty cute.  She's like Little Red Riding Hood. 

Here is a nice list of things you'll want to get:

1. sticks of all shapes and sizes.  You never know what you're going to do with them.

2. Stones and pebbles (great to use for little paths)
3. Pinecones
4. Vines (you can make string)
5. Dead leaves and flowers (for roofs or or bedding)
6. recently mowed grass
7. Soil (for making little garden beds)
8. Seeds (to plant in your garden bed)
9. Acorns (make wonderful cups)


Maddie finding river stones in the park area of The Lehigh Valley Zoo


To be continued.....

Thursday, June 21, 2012

Origami? Origam-you!


Origami is the Japanese art of folding paper.  It's a really fabulous crafts that even the smallest of hands can master.  I certainly don't think a 4 year old can make a dragon, but there are all levels of objects.  The great thing about oragami is that it doesn't really cost anything to do.  Nevermind all the fancy types of paper you're supposed to use.  These are kids.  A two dollar pack of construction paper or even computer paper work just fine.  Perhaps when your kids make it to competition level you might want to invest in some sort of "hand made using home grown herbs and flowers" paper, but not today.

Cost of project?  A couple of bucks
Time investment?  As long as your kids can continue to make new things, endless.


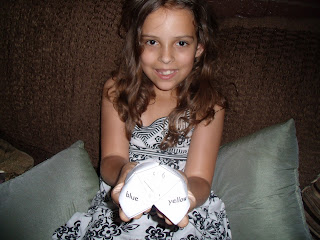
I challenge any girl out there to tell me they don't remember the little oragami finger fortune teller.  Pick a color.  Now pick a number.  Now pick another number.  One more number. Your fortune is.... Such fun.  I was surprised that after all these years (25+/-) I still basically remember how to make one.  Maddie handed me a piece of paper and asked me to fold it.  It was sloppy, but I did it. The muscle memory was there.

Below is an easy tutorial on how to make these fortune tellers.  It takes about 4 minutes to do, and perhaps a another 10 to figure out what to put as the fortunes.  You don't have to use actual fortunes.  Here are some ideas for the hidden message under the flap:

1.  Put family names inside and use the fortune teller to determine chores!
2. You can put "good deed" ideas inside.
3.  What to eat for a meal
4.  What games to play if you have to choose
5.  What book to read next

Here's a great youtube tutorial.


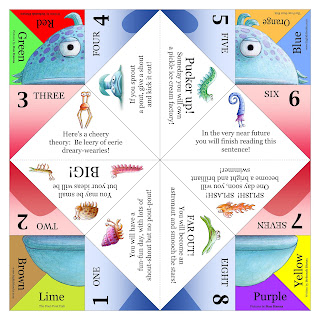
The template below helps you figure out on which flap to put your numbers, colors, shapes, fortunes, etc... Don't feel obligated to use numbers! Use your favorite stars!  You don't have to use colors!  Use your favorite candies!  You are only limited by your imagination...which means you shouldn't be limited at all. (click the link for the full sized template)


Here's a second alternative


We are using youtube tutorials to learn how to do other shapes and animals.  It's a slow process, but fun.  Mistakes are OK.  If you don't want to waste paper that you make mistakes on and crumble, just use them for other art projects, many of which we'll talk about in later posts.

Have fun!  See you tomorrow...if that's what my fortune reads...

Tuesday, June 19, 2012

Put Me in the Zoo

Zoo animals are ambassadors for their cousins in the wild.
~Jack Hanna


 A hike down to the Philadelphia Zoo is a full day adventure.  I absolutely advocate going there at least once during the summer.  But can you have a sustained summer zoo experience with the Philly Zoo?  Not so much, unless you want to fight Philly traffic every day, there and back, and spend a lot of money each visit.  What's the alternative?  The Lehigh Valley Zoo, which was previously known as the Trexler Game Preserve.  Years ago, when the LVZoo was the TGP, it received a great deal of negative reviews such as no exciting animals and boring exhibits. If you've been there recently you already know this isn't true any longer.  The LVZoo is an incredible place to take the kids for several hours (and the prices aren't too bad).

Maddie and I have a season pass.  The pass costs $95.00 a year.  Might seen like a lot, but it's for two adults and two children.  It includes all of the entrance fees and percentage off the gift shop and food pavilion.  The park rates are as follows:  $10.75 per adult and $8.50 per child.  For a family of four, that's $38.50 for one visit.  Two and a half visits and you pay off your pass.  We've been to the zoo at least 7 or 8 times already this year.  

Can it really be exciting 8 times?  Absolutely.  The animals act differently each time we go; there are different programs most weekends (scavenger hunts, make free bird houses, etc...), and, well, it's animals...kids love animals no matter how often they see them (watch a kid jump for joy at the sight of the same squirrel they have seen everyday for the last two months).  Every time we visit Maddie acts like it's the first time she has seen the exhibits.

For summer adventures to the zoo, it's important that you know a few things about the LVZoo.  First, the best time to go is a weekday morning.  It's quiet, and you can visit with the animals with less pushy kids and parents around.


The morning is best.  It's not as hot so the animals are often up and around.  In the heat of the day, they have often found shelter in their enclosures and sleep. Today's visit was the first time I saw the bobcat up and walking around! In the morning, the lorekeets (beautiful colorful birds) are hungry.  You can purchase a cup of nectar for $1 (all proceeds go to the zoo) and feed them.  The birds come right down to you, and if they feel up to it, they'll land on you. By late afternoon, they're stuffed and don't want to eat. If you go early enough you can see penguin feeding time at 11AM.  If you miss the AM feeding, there is an additional one at 3PM.


 The Species Survival Program

The LVZoo participates in the Species Survival Plan.  Endangered, threatened, and species of concern are managed and shared across the country to breed and build up population.  Every animal in the program has its DNA on record.  To prevent inbreeding that can weaken the population, animals are checked against proposed mates to make sure they are not closely related, or related at all.  The animals are brought together at one zoo or another, and allowed to mate naturally. The Mexican Gray Wolf wild population (three males are housed at the LVZoo) dwindled to 50 animals (yes, I said only 50).  Through the SSP, 11 more wolves have been released into the wild.  Slow but sure.  When you visit the zoo, you help fund the SSP program.

One of the zoo workers explained how they introduce wolves into the wild when the mommas are not wild themselves.  They begin by putting the family in a huge paddock.  They feed momma while she nurses.  When the little ones are weaned, they introduce live prey into the enclosure. Their wild instincts do kick in, and with live prey, momma does assist in their predator education. Slowly, they increase the size of the prey until it mimics the natural setting.  When the wolves successfully bring down prey consistently, the doors to the paddock are left open, and they wander out on their own.  If momma has adapted to the hunt, she can leave with them if she chooses. They are tagged and followed to make sure they are doing well.  Pretty neat.

The list of LVZoo animals that participate in the program are: Kordofan Aoudad, Bobcat, West African Black Crowned Crane, Red Kangaroo, Laughing Kookaburra, Mongoose Lemur, Canada Lynx, Scimitar Horned Oryx, North American River Otter, Snowy Owl, African Penguin, Prehensile-Tailed Porcupine, Trumpeter Swan, Tammar Wallaby, Mexican Gray Wolf, and Plains Zebra.  

Lunch

The zoo offers an outdoor cafe with typical food such as hot dogs and hamburgers.  The nice thing about the zoo is that they are perfectly happy if you bring your own food.  Pack a picnic lunch, and eat it in the pavilion, any number of picnic tables in the park, or down by the stream crossing.  *Note: Please make sure you do not bring straws, and plastic bits.  Use bottled water or a thermos instead of Capri Suns or juice boxes.  If you drop the straw or a bit of the plastic, animals could eat them. They could become seriously injured or die. Instead of disposable items, opt for green items that do not create trash and can be taken back home, such as plastic sandwich keepers instead of ziploc baggies.

 Interactive Exhibits

The zoo offers hands on exhibits as well.  There is a goat petting zoo where you can feed them from the outside of the pen, and then go inside to brush them.


When big daddy is in a good mood, you can go inside the red kangaroo paddock and walk the path.  Sometimes big daddy comes up to the rope. You can't pet him, of course, but it's neat to see a kanga that close.  Don't worry...the handler is always there.


Almost consistently throughout the day, volunteers and employees offer information, lectures, and "please touch me" furs, skeletons, shells, and eggs.


The Stream Crossing

But wait!  Even when you're finished with the zoo, you aren't finished with the game land area.  When you exit the zoo, you will cross a small water bridge.  You can stop your car and get out.  There are tadpoles to catch, rocks to skip, and water to splash.  We can spend over an hour right here, and it's completely free.


After you finish playing in the stream, make sure to drive very slowly throughout the rest of the park.  In the preserve area you will be able to see Plains Bison (not buffalo...), and large elk.  You can pull over, take pictures, and just watch them for a while.  It's a nice way to end the day.

Please hop over to the zoo website:


And the smallest one was Madeline: Volunteering

 "When kids volunteer it tells others that they don't have to be perfect or famous or even grown up to make a difference."
~Kalynn Dobos


For the last two years Maddie and I have volunteered out time at a local animal rescue, FURR (Feline Urban Rescue and Rehabilitation).  We go into Petco (where FURR cats are displayed) once or twice a week, and for about 45 minutes we clean cages, socialize with the animals, and make a difference in the lives of not only the animals that were abused, neglected, and strays, but in the people who adopt them.  One of the directors named a small feral cat after Madeline because she was FURR's smallest volunteer.  With everyone's help, including Maddie, Madeline the cat was rehabilitated, and now lives a pampered life with a family who loves her.

Maddie doesn't do the heavy work.  I clean the litter, prepare all the food, drag away the garbage.  She cleans the insides of the windows, puts the food in the cages, and loves them until they want to squirm away (get used to it cat, you might have come from a place with no love, but you're in for it now.) 

Cleaning Emmy and Palmer's cubby


On adoption day, each Saturday, she helps me set up cages that will display animals that come once a week from foster homes.  I set up the cages, and Maddie prepared a little litter box for each, a water dish, and a blanket for them to sleep on.  When people start to arrive to look at our cats, Maddie has no problem telling anyone and everyone how wonderful it is to have a cat.  She'll also lay on the sob story. "Sugar's owner died and no one in the family wanted her."  True story, but coming from an eight year old with a frowny face it's far more heart tugging.   

Maddie with Emmy
Why volunteer? Because you should.  You need to teach your children that we're apart of this world and responsible for it. Social conscienceness is decidedly lacking in today's society. 

Definition: Social Conscience: an attitude of sensitivity toward and sense of responsibility regarding injustice and problems in society..a knowledge or understanding of what is morally right in society. 

If you want to find the right volunteer activity for your child, you need to decide what your child likes the most.  Do they like animals?  Do they like grandma and grandpa?  Do they like other kids?  Let them decide and you do the work finding something to match their interest.  Here are two areas that are always desperate for help.

Animals

If they like animals, volunteer opportunities exist with many rescue operations.  While not all children will be able to work directly in animal care, there are other options: volunteering during fundraisers, helping to sell raffle tickets, and animal care if they are old enough.  Make sure if your child works for a shelter, you let them actually see the animals they are helping.  Go to adoption day.  Encourage to learn about the organization, and the process of helping these animals. In school, Maddie wrote a book called "Madeline's Rescue" about the feral cat she helped.  The director of FURR read it and was not surprised that Maddie wrote about FURR, but was surprised her was how completely and totally Maddie understood the entire process for the minute we pick up a stray until the moment it goes to a furrever home: pick up, vet check, spay or neuter, foster home placement and rehabilitation if necessary, adoption day event, adoptee application and approval, furrever home.  That's a long process, and a lot of hard work that most people don't know about.  

The Elderly

If your children are comfortable around the elderly, every single long term nursing facility will have a place for you and your child to volunteer.  Things such as passing out BINGO cards or letting the residents read to them.  Children, in no uncertain terms, enhance and enrich the lives of the elderly, and in return enrich the lives of the child.  Some of the greatest conversations I've had with anyone were with WWII vets. After striking up a conversation with a gentleman in McDonalds, I learned firsthand what the soldiers felt storming the beaches at Normandy (he survived the assault and went on into Germany with the Allied armies to help overthrow the Fuehrer).  I feel privileged to learn from such a direct source, and was overcome with emotion when I thanked him for telling me.  He thanked me for listening...and more importantly, he thanked me for being interested.  The Greatest Generation is almost gone...don't let yourself, or your child, lose the opportunity to be a part of these people's lives before they are no more.  These people are walking encylopedias and it is our responsibility to care for those who cared for us. If you're very lucky, your child will grown through the program and perhaps become a true working volunteer when he/she is older enough (around 15-16).
 
Not sure what you want to do, or you are sure and don't know where to go? Take a look at "Volunteer Match."  Volunteer Match takes in the criteria you give it and matches you to organizations that need your help. This is by far one of the best volunteering information sites I've come across in a long time.


This blog originates in the Lehigh Valley, PA region.  The following links are mostly for this area.  If you are out of this area, the first three links, plus Volunteer Match above, will be more apropos.

Please take a look at these links:


Lehigh County Volunteer List This is a VERY inclusive list!


Saturday, June 16, 2012

Triple Lemon Icy Freezy Pops

Today we made the first recipe out of our new favorite kid's cookbook: The Unofficial Harry Potter Cookbook. This book is available in bookstore likes Barnes and Noble, and online on Amazon. It's worth the money.  Maddie and I flipped through it and marked all the recipes we want to try.  Our first experiment was Triple Power Icy Lemon Pops.  Harry received a lemon pop for his birthday from the Dursleys (they had no intention of getting him a cake), and the secret password to Dumbledore's office is "Lemon Drop."

A Note on Knife Usage

This was the first time Maddie used a real cutting knife. We originally cut the lemon into pieces, but eventually decided against using it.  I want to offer a word on knife use.  No, this isn't going to be the typical always supervise kids when using knives.  If you don't, well, you're an idiot (no need to be politically correct here).  No, this is about proper knife usage.  This goes for parents as well.  I learned this after seeing chef Alton Brown at a cooking presentation.

Do NOT hold your knife like the following.  You have no control over the blade:


Hold your knife like THIS. You control the entire knife from handle to tip.  Additionally, teach your children to slice forward, not toward themselves. (And a note about the pictures...obviously I was right there, and no, she used a small knife to cut.  The big one was simply easier to photograph)


Alrighty...let's get to the recipe.


Ingredients:

Grated zest of 1 lemon (we skipped this because Maddie doesn't care for the consistency)
3 Tablespoons of lemon juice
7 Tablespoons of granulated sugar
1 and 3/4 cups of water
1/2 teaspoon of lemon extract (huh?  Who has this?  It was supposed to be used to intensify the yellow color and the taste...I just used a little yellow food coloring, and the lemon juice was enough "lemony flavor" for us) 

Process:

Combine the juice, sugar, and water together in a saucepan.  Mix thoroughly and often as you bring the mixture to simmer.  As soon as it simmers take it off the stove and add the lemon extract (or the food coloring).  Mix again until blended. 


I found little plastic freezer pop molds at the local CVS.  My guess is that you can get them at the Dollar Store or any grocery store that sells summer knick knacks.  I suggest purchasing two of them.  We had a lot of solution left over.  If you don't want to waste, pour into ice cube trays, and either leave them simply as ice cubes (I bet they'll look awesome in pink lemonade), or cellophane over the entire ice cube tray, and stick little toothpicks in each cube mold and make cute little ice pops.  (I bet you remember doing that as a kid, don't you).  Put the molds and ice cube trays in the freezer and, well, freeze them.  Summery, refreshing, and fun to make. (Oh, and this used about about a half hour...)

  
This was fun, easy, and allowed Maddie to do a little cooking.  Obviously you don't want your child to pour the hot liquid into the molds.  Again, if you do, you're an idiot.  Safety guys.  Remember that little fingers and little hands are clumbsy...hence the need to teach them early on how to hold a knife. You're enforcing safety in the kitchen, and hopefully it's a habit they'll get into permanently. 

Voila! Big sister Meg and little sister Maddie enjoy Maddie's creation.


Friday, June 15, 2012

Let's Sculpt Something Together!

 My mom's the one I look up to for everything. I feel like I'm a lump of clay and she's molding me into a woman.
~Chloe Moretz


The sarcophagus post is going to be put off by a day.  Today we worked on clay figures!  Kids love to touch and mold so clay is one of the best options for an one or two hours of creative activities.  You have two options with clay, and one of them is not play-do. Play-do is a cruddy sculpture medium.  It smells funny, and when it dries out, it cracks.  It's made to be temporary.  Let's take a look at good clay. Both types are available as kits that usually include sculpture tools, and single packs of color.  I'd go with the kit.  It usually has ROY G. BIV.

Play-do cleaning tip: If your little ones gets Play-do in the carpet don't panic.  Let the Play-do dry solid, and then simply pick it, or scrape it off.

The first is regular molding clay.  This clay is superior to Play-do because it stays moist no matter how long it's out.  I'm sure it'll dry out eventually, but I haven't been able to find that cutoff.

The second is molding clay that bakes solid. This is the kind we used because my daughter can permanently keep what she makes.  This is great for future crafts like dioramas, or puppet shows.

Step One: You have to work the clay soft.  If your kids are young, you'll have to do this for them.  After working with two colors, your fingers are going to hurt.  I won't kid you.  The best thing to do is to work smaller amounts, and only the colors your child requests.  Squeeze and roll the clay until it's soft and pliable. Now it's sculpting time!

Step Two: lay down plastic, or tin foil.  If you'll notice from the picture we started with newspaper.  Bad idea.  As you roll and mold your clay, it picks up the ink from the newsprint.  Live and learn. Use the newspaper to set down tools.

Most clay kits have molding tools.  If you purchase clay without a kit, and you have no tools, you can improvise.  Pencils, plastic knives for cutting clay (only parents should use this), spoons, chop sticks, and fingers.

 
Step Three: GO!  The easiest thing for little ones are snakes.  They help them get the feel of working with clay.  You'll need to learn the snake roll anyway, as that sort of shape is important for arms, legs, the curled shells of snails, etc.  Also, make sure to roll up balls of all sizes for eyes, heads, bodies, etc...  You'll quickly get the hang of it.  If you have a little one, don't be tempted to "fix" anything they've made with the exception of making sure parts are stuck together tightly.  Be proud of what they made, even if it doesn't quite look like, uh, well, an airplane.  Make sure you make a few things on your own as well.  This is quality together time.

Step Four: BAKE!  Of course, double check that your clay is bake clay (the other clay will melt in your oven and smell bad).  Pre-heat the oven to 275 degrees.  When the oven is heated, carefully place your creations in a glass baking pan or dish. Bake for about 15 minutes (thicker pieces may require 5-10 minutes more.  Take out of oven and cool.  If any pieces fall off once the creation is completely cool you can glue the pieces back on.  You can also use acrylic paints if you want to change the color of any creation.


Here are out creations!  I made the bowl of fruit and the cupcake.  My daughter made the rest.

Happy sculpting!!

Wednesday, June 13, 2012

"You came back from the desert with a new friend. Didn't you, Beni?" Mummy Making Part One


Day Two: Summer Vacation.  All is going according to plan.  Maddie has been neat and tidy, helping me clean her room, and so far the crafts she's chosen have been neat as....Oh, no.  Plaster of Paris.

Meet our new craft. Make your own mummy.


I got this kit at A.C. Moore on clearance.  It was $19.99 and I bagged it for $5.99.  Never underestimate the power of the clearance aisle and always look for those "discount" stickers.  On a good day I can pick up at least three or four craft kids for about $20-25.  That's not bad.  And each one is a big chunk out of your day.  Not only that, most of these crafts are powered on imagination.  A word of caution on crafts: If you are going for crafts that stretch your child's imagination, skip the ones that are prefab, and put together with just a little glue (those foam stickers on foam paper things are the worst).  Where's the stimulation in that?  Go for crafts that rely on imagination: those that require painting, glitter, beads, mummies, clay, weaving, building, etc...While the mummy might seem to be sort of cut and dry and boring, your child is introduced to an artistic medium she may have never used before.  Exposing children to as many forms of art, in this case sculpture, is vital to their Humanities and artistic education.

But I do wonder why these mummy kits were on discount (and why there were so many of them). I wonder why they weren't selling.  Is there an underground mommy boycott?  Is it just too messy?  To heck with messy!  I have an "outside" and I have a hose.  I'll be using them both.

Step One: Protect your clothing and surfaces.  Smock.  Rag tee-shirt.  Apron. Make sure to put down plastic.  A section of a regular garbage bag will do.


Step Two:  This kit comes with a little pliable skeleton.  You can pose him anyway you want.  One of the examples is a walking mummy. We chose to make a mummy that was laying down.  We'll be making a sarcophagus so we need Imhotep in the proper position.  If you want to do this without a kit, get masking tape and newspaper (paper towels work, too), and mold, crush, and tape, creating a form into anything you like. You can make a cat shape (the Egyptians mummified cats), for example.

Step Three: The plaster of Paris strips come in a roll.  You'll need to cut it into workable strips about 6-8" long and 2" width.  Again, if you aren't using a kit, you can get rolls of plaster of Paris at local crafts stores like AC Moore and Joann's. They have them; I checked for you.

Step Four: Get a shallow bowl (the kit provides you with one), and fill with cool water. The kit comes with gloves, but if you're brave, you can do this without.  Just make sure to clean your hands immediately after you're finished.

Dip the strips in until wet. Don't soak them or they will lose the plaster.  Wrap the strips around the form.  Work somewhat quickly, as the plaster will begin to set.  Make sure you smooth out wrinkles.  I suggest you cover the mummy head to toe at least twice.


And voila!  You have a mummy!  Let it dry for several hours.  The outside might be hard, but the inside might still be soggy, and that can compromise the shape.

This craft took up about an hour.  YAY!  It wasn't as messy as I thought it would be, so I think you could actually do this craft at a kitchen table.


Tune in tomorrow for Mummy Making Part Two: The Sarcophagus

Why Your Child Needs the Summer Reading Program at the Library


Since I can remember, I have been involved in the summer reading program at my local public library.  When I was a little girl I remember taking out books and returning them read so that I could earn prizes, and I have enjoyed every moment of being a parent of summer reading program participants. My library still has the awful orange hard plastic oval 70s chairs that I loved when I was growing up. But it wasn't the prizes that that were important....and it wasn't even reading the books.  The most important part of the summer reading program was reporting books to the librarian, and being present in the library for all the programs they offered (and spinning until dizzy in the awful plastic oval chairs).


The summer reading program is free (and so is the air conditioning...).

Programs

Most, if not all, summer reading programs have more than just book reporting.  Many have special events and visitors.  Please take them up on the invitation. Not only does it teach and engage children, but I'll give you a hint...it eats up at least two or three hours a week.  Every Friday morning my library has Books and Bagels.  The kids munch on bagels while the world's coolest kid's librarian reads stories. He's awesome...he has an awesome goatee, plays guitar, and looks like he's the front man in a grunge band (it's great to watch "Kurt Cobain" sing Laurie Berkner's We Are the Dinosaurs).  The books might be for young children, but it engages all the kids for the entire half hour (and if bribing them with bagels and juice gets them there, so be it!).  Listening to someone read teaches children how to read themselves.  It teaches tone, inflection, pacing, and fluency.  I don't care how old your kids are...READ TO THEM and let others read to them.

Our library has visitors.  Below is my daughter in her bee suit (her father is a beekeeper and she helps) when a representative of a Beekeeping Association came to talk to the kids about the importance of bees.  They brought observations hives, honey, and a lot of information. Your kids will learn so much from visitors AND they will learn to be good listeners and good audience members, lessons that are sorely needed in today's society. 


Book Reporting

Reading is the most important skill all children need to master, but being responsible for analysis, comprehension, and the ability to discuss what was read is more important than most realize.  In my opinion, mastering these skills is what gave me an edge in school...even all the way to college.

The key to this is having both a good library program and a great librarian.  A good librarian will ask you what your favorite part of the book was.  A great librarian will ask you why it was your favorite.  A good librarian will ask you what the plot was.  A great librarian will ask you if you've ever read a book that had a similar plot.  A good librarian just writes the titles of the books down and sends you on your way.  A great librarian suggests additional books that have the same subject as the books you liked.

A great librarian realizes that a child might be reporting on information he/she doesn't know, and asks the child to teach him/her.

We are fortunate.  We have great librarians.

What do you do if you don't have a great librarian?  Fill in.  Below are some fabulous questions to use when discussing books with your children. And remember, do NOT ask close ended questions, questions that can be answered with a "yes" or a "no."

Universal Questions for Book Reporting

  1. What did you enjoy about this book?
  2. What have you read that is similar to this book?
  3. What are some of the major themes of this book?
  4. What do you think the author was trying to accomplish with this novel?
  5. Who was your favorite character? What did you appreciate about him/her?
  6. Consider the main character: what does he or she believe in? What is he or she willing to figtht for?
  7. At the end of the book, do you feel hope for the characters?
  8. What is stronger in the book: plot or character development? Why? Do you think this was intentional on the part of the author?
  9. Have you ever experienced anything similar to the action of this novel?
  10. Did you find this book a quick read? Why or why not?
  11. What are your concerns about this book?
  12. How did you feel about the main character?
  13. What are the most important relationships in the book?
  14. What makes a minor character memorable?
  15. What are the most revealing scenes?
  16. Are any of the events in the book relevant to your own life?
  17. What did you think of the style of the writer?
  18. Was the story credible? The characters credible?
  19. Did you find any flaws in the book?
  20. Compare the hardcover and paperback covers. Which one do you like better? Why?
Created in part with funds granted by the Oregon State Library under the Library Services and Technology Act, administered by the Oregon State Library. Send feedback to Katie O'Dell, School-age Services Manager

READING TIME!!

Make sure to have your children read silently for AT LEAST 15 minutes a day (a half an hour is better) and it won't hurt for you to read to them for another 15.  That's a half an hour out of each day!