Sunday, July 13, 2014

The Fun of Cosplay


Why wait for Halloween?  In just about every area of the US there is a Comic Con going on somewhere.  Comic Conventions have exploded over the last 10 years.  Not only a place to buy comic books, Comic Cons always have special guests, costume contests, and other fun activities for the whole family.  Maddie's first Comic Con was very small.  It was a one day event in our home town.  Small as it might have been, it didn't stop 4,000 people from lining up to attend, a good 20% in costume.  The entry fee was reasonable for adults and free for kids 12 and under.

There are larger Comic Cons in San Diego, Philadelphia, New York, and Las Vegas.  My dream is to take Maddie to one of those (with guests like Nathan Fillion and the cast of The Avengers) but I'm not ready to mortgage the house to get there, pay for the entire weekend gold passes, have a place to stay, and eat a meal or two a day.  So...Allentown Comic Con it was.

 Costumes

Costumes are absolutely not required for a Con, but why not?  Adults sometimes get a few dollars off their tickets and it's fun for just one day to pretend you are a superhero.  Watching sci-fi shows, superhero flicks, reading comics book all have something in common: creativity and imagination.  When children are exposed to fantasy they learn creativity.  Their creativity manifests itself in many forms from writing and drawing to mathematics and science.  The creative mind sees a problem or an idea and thinks of the many, many ways it can be solved.  They see options and solutions.  Creative people make the world go around. Creativity makes our life better.

For Maddie's first Comic Con we made a Dalek costume for her.  A Dalek is a villain from the Dr. Who world.  Here's a little tutorial for making a Dalek dress.  Whenever I make costumes (and I rarely ever use store bought patterns) it's a lot of trial and error and creativity.  This can work for any costume you want.  If you are more comfortable with patterns don't be discouraged if you can't find exactly what you want.  Use different parts of different patterns.  Use the bodice from Pattern A and mix it with the skirt of Pattern B. Embellishments and accessories make the costume!  Spare no expense for Wonder Woman's crown, Dr. Who's sonic screw driver, or Harry Potter's wand.  You can make all of these things easily but never feel bad if you choose to purchase them.

*Note: The next section deals with a hand made costume.  No one says you have to wear a handmade costume to a Con.  Off the shelf are awesome as well.  As long as you find the connection. The following tutorial is more to give you the skills you need to create any costume.


*Note: Standard weapons needed for any costume construction is glue glue glue.  Choose your glue wisely.  Most of the "fabric" glue is woefully inadequate and hot glue doesn't work with a lot of different materials, often just peeling off.  Over the years I have found two fabric glues strong enough to hold costumes together.  Remember, your child (or you) will be wearing and moving in costume.    The following glues are gold.


To make a hand made costume you need a good picture of what you are copying. Some minor sewing skills are always needed. Basically, if you can sew a straight line you're golden.  We decided on a Dalek from Dr. Who.  Maddie loves Dr. Who.  So we found a picture of what she wanted. That was our guide.
Break down the picture.  There are three sections to this Dalek: the bottom with the bumps and black bumper, the middle section with the gold plates and weapons, and the top portion with the helmet and vents.  Look at the weapons.  It's a plunger and a paint roller spray painted silver.  That's it.  Easy.

Here's what you'll need:
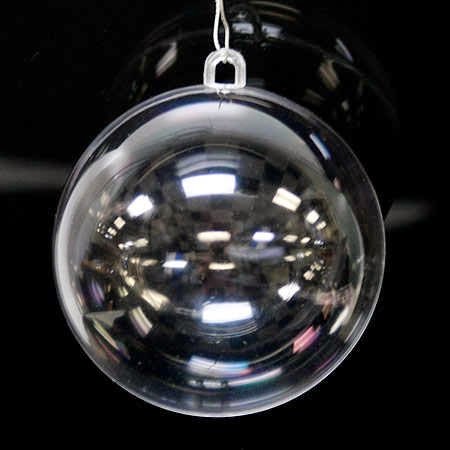
Christmas ornament halves
Silver and gold spray paint
six medium thickness dowels (and something to cut the dowels)
brown fabric (you'll have to make the measurements)
black silky fabric (about 2 yards)
brown (non silky) fabric (about a half yard)
glue as noted
elastic for the waist
a spool of medium thickness black ribbon
2 spools of thin brown ribbon that matches the brown fabric
gold fabric (1/2 yard)
2 medicine cups (clear)
one headband
one plunger (new please)
one paint roller with the handle cut off
Styrofoam tubing instead of black silky fabric if that is the way you will make the bumpers.


I broke this up into a bodice section and a skirt section.  You will need to measure your child from waist to floor to figure out how many yards you need for the skirt.  You will make six panels measuring 7 inches at the top and flaring to 13 inches at the bottom (1/2 seam allowance on each side when you sew the panels together).  Since I used no pattern for this, the following is my pretty awful plans.  Don't worry about how awful your plans are.  Your plans will help you make the best costume you can.


The skirt is the first part of the dress and probably the most time consuming.  The skirt will have six panels sewn together.  Each panel should be about 7 inches on the top and open up evenly to about 13 inches on the bottom. Make sure you measure your wearer from the waist to about 3 inches off the floor (the bumper will take the other three inches).  Sew all six panels together with a 1/2 seam allowance on each side.  Hem the bottom all around and when you hem the top make a small casing along the top.  You will be stringing elastic cord through it.  Cut the cord so that it is a little tight on the waist.  Fix a safety pin on one end of the elastic so you can thread it through the casing.  Once the entire skirt is on the elastic stitch the elastic at each end.

The final step of the dress is the black bumpers.  

THE HARD WAY (This is what I did before I thought about it). I chose a shiny black fabric to look like plastic.  Measure each finished panel on the bottom. This is how long you are going to make each bumper.  The bumpers are nothing more than tubes.  You are going to make depth 3 inches so cut six pieces of black silky fabric the length of your panel by four inches for a one inch seam allowance. Sew along the edge and turn right side in when finished (leave the ends open).  Stuff each tube with batting.  Fold over the ends (make sure they are long enough to fit the panel edge) and sew the ends shut.  Using the fabric glue glue the proper length dowel on the inside to give it stability.

THE EASY WAY (hindsight is 20/20, right?)  Black foam.  Cut to length of each panel and glue.  You might need to secure the bend at each panel juncture.  A piece of hard wire threaded through the entire foam becomes bendable at the joints.

Duh.


The Dalek bumps were a bit of a challenge but I managed to figure out what to do.  The bumps are smooth so half of a Styrofoam ball wouldn't cut it. I also toyed with making fabric puff balls and stuffing them but they weren't right either.  Then lo and behold it came to me.  Half of the make your own ornaments ornaments and gold spray paint. There are four bumps per panel meaning you need 12 balls (24 halves).  These are 100 mm balls (about 4 inches). 


When working with your Dalek bumps you need to make a solid back for them to adhere to the dress. Before you spray paint the halves you have to first gently break off the hooks (a little file or an easy break). Then place the ball on heavy weight paper.  Glue the ball onto the paper by putting glue around the edges of the ball and pressing down. Let them dry.  Then using an exact-o knife cut out the ball with the paper on the back.  Spray paint the entire thing gold (you needn't paint the bottom), to eventually glue them on the dress. When you are ready to glue, have someone wear the skirt.  It makes placement easier.


Once you have the Dalek bumps sorted out you are ready to glue them on.  Have your model wear the dress so you can space out the bumps, four on each panel. Use the loctite glue shown earlier and spread the glue over the whole back.  Press into place and hold for a few seconds.

*Note: Due to the weight of the dress you might need to make braces.  This is easy.  Use the heavy ribbon, hold the skirt to where you want it to fall on the floor, measure the lace from waist over the shoulder for each shoulder, cut, and sew onto the skirt.


The bodice is nothing more than two pieces of fabric in brown and black sewed together.  It should fit around the chest easily. If you don't want to do buttons or fasteners, string on the corners to tie the bodice together works.  Always give yourself a little extra to hem around the edges. Makes it look nicer on the outside.

Looks terrible on the inside but who cares.
The trim on the bodice is easy but time consuming. Cut out enough rectangles to evenly fit on the bottom brown section of the bodice.  Use the fabric tac glue rather than the loctite glue them on evenly.  For the upper section of the bodice (the black section), cut four lengths of brown ribbon that go the entire length of the bodice.  Glue them across.  Cut five lengths of ribbon that measure from top to bottom of the black portion of the bodice and glue them evenly with the first being in the center of the bodice.  To make shoulder straps put the bodice on the model.  Mark with pins where the strap would be most comfortable on the front and on the back.  Sew the straps on in those places.

*Note: If you get the fabric-tac someplace you don't want it to go you have two options.  One, wait until it dries a bit and gently scrape if off.  I used edge of a knife (slowly slowly gently!). Two, use nail polish remover and gently go over it until the glue gums up and you can pull it off.


Finally...the accessories.  No Dalek can live with out his sensors and his weapons.  The sensors are nothing more than two larger medicine cups (off of NyQuil bottles) glued to a headband.  I got this gold one at our local Dollar Store.


 The Dalek weapons are a toiler plunger with it's handle painted silver (please make it new) and a paint roller with the handle cut off.  This might take some doing.  Find someone with a dremel or a metal coping saw.  Be careful of sharp edges.


EXTERMINATE!


And the results are in!

Wednesday, May 28, 2014

The Life Microbiotic

"Many drops make a bucket, many buckets make a pond, many ponds make a lake, and many lakes make an ocean."
Percy Ross 

We kick of the summer projects with the first of many microscope activities.  I just bought Maddie a little battery powered microscope set.  No particular bells and whistles, but a lot of things to get a kid going.  For about $25 this kit came with a small microscope, pre-made slides, blank slides and covers, labels, specimen jars, a pipette, some tools like a spatula, and test tubes.  Although I have an English degree, my biology and bio lab classes were among my favorite.  I enjoyed the field work the most and decided examining pond water would be the best place to start. Pond water has living, moving organisms in it.  Pond water is full of wonder! This type of specimen also gave Maddie her first shot at preparing a temporary wet slide (and she did a pretty good job!).  Now that she knows how we can both look forward to days of scraping the insides of our cheeks for cells or running for the blank slide when one of us cuts ourselves.  It's going to be a great summer.

Step One: Find a pond and take a sample

Easier said than done if you live in a city. We're fortunate that we have a few ponds in our area. Pond water is not the same as puddle or standing water.  Ponds are ecosystems. You might be able to try water from a rain puddle, but you probably won't see much. Even if you have to drive a little out of the way, use pond water.  No two ponds are alike, but they will all have things in common such as algae and single celled organisms. To collect pond water make sure you have a jar that has a screw lid. Maddie's kit came with a small pipette and a jar. If you don't have a pipette, dip any bottle that has a lid into the pond to collect the water. Try to avoid spots that have any garbage. Don't fall in!


Step Two: Make a wet slide

This isn't very hard at all and little fingers can manage this part of the activity. I will caution you, if you use real glass slides and/or real glass covers, please prepare the slides yourself. Glass slides are very sharp on the edges and can also crack easily. There are blank plastic slides available for little cost and it is a better choice if your child is under 10. And remember to label that specimen bottle right away! There is no need to label a temporary wet slide. You will use it and discard or wash it.

Date
Place
Contents

When you get home, get a clean blank slide. Set it down on the table. Using your pipette, take a very small drop of water out of your specimen bottle and drop it onto the center of the blank slide.


From the corner, slide the cover down onto the drop of water. Make sure to go slowly to avoid making air bubbles.  If you do get an air bubble you can gently work it out by moving the slide cover around a bit.  If it doesn't work itself out don't worry about it.  You'll just have to remember it's there when you look at the slide and wonder why there is a whole section with nothing in it!  Don't ever push down on your cover.  You don't want to crush what is underneath.  While you really won't crush anything in pond water (everything is so tiny), it's just a good habit to get into, as you may eventually want to look at bigger specimens.  Remember...if you use a glass slide cover, it will break from even the slightest bit of pressure.


Step Three: Using your microscope

Before you start using your microscope you should get to know it. Microscopes have many moving parts and many of these parts are delicate. Many of these parts are often breakable even on a child's microscope (though I'm certain it would take a bit more force). Below is a diagram of the parts on standard microscopes. All microscopes have the same parts, the only differences being how many eyepieces (some are for one eye and some use both eyes) and the different objective lens magnifications (not all will be the same). In most instructions booklets the terms you should be most familiar with are "stage," "objective lens," and "focus" knob.
When you put a slide on your microscope stage, make sure the objective lenses are as far up as possible when you begin. When the slide is secure, look into the eye piece and slowly move the focus down until you can see an image clearly. If you have a fine focus use that to make the picture more sharp. Always make sure your lenses are all the way up before changing a lens or putting in a new slide. Again, be careful if you are using glass covers. If you force your lens down onto the stage you will crush the cover.


Step Four: Journal your discoveries!

What fun is looking at little alien living creatures if you forget what they look like! In my bio class I had the best time drawing a little green disk looking organism that was probably one of the most beautiful things I had ever seen. If you are going to look at many different slides over the summer get a small notebook. Give your child colored pencils and crayons. Sometimes an object will stay put (like a string of plant life) and you can get more detailed drawings. Sometimes the object will be this fast little blob that skates through your field of  vision and your child has to rely upon a quick memory. If you don't know what your organism is name it yourself! At the end of the summer go over your journal and look at all the things you saw in a world too small for the human eye to see without help.


Monday, May 5, 2014

Gearing Up For Camp Mommy 2014


I was fortunate enough to get a job with the school district. This way I have summers off and don't have to pony up nearly $200 a week for day camp which would pale in comparison to the educational summers I plan for my daughter.  Yeah. I'll pat myself on the back.  But that means coming up with another summer's worth of activities.  Some will be repeats such as the pool and museum, but I'll have to add new plans to keep my daughter's mind crisp and active.

We decided that this will be the summer of science.  Check back soon...there will be science projects for the whole family, reviews of science center exhibits,  and making daily science journals.  It's going to be a good summer.

See you there!


Friday, August 2, 2013

Cleaning Out a Kid's Room~ Is my kid a hoarder?

“Memories of childhood were the dreams that stayed with you after you woke.”
―Julian Barnes England, England

This evening I read The Elves and the Shoemaker to my younger daughter before bed.  I'm very much taken with fairy tales, something I've passed on to both my daughters. Meghan (Dear Daughter Number One) and I buy each other copies of collections.  Meghan and I have individually been collecting the DVDs of the current re-told fairy tale movies that have recently come out (and a few older ones like Snow White: Tale of Terror--NOT for kids).  Mirror, Mirror and Jack the Giant Killer (both absolutely kid friendly!!) and movies like Snow White and the Huntsman and Hansel and Gretel: Witch Hunters (also NOT for kids), etc...  We love fairy tales. We love to read them. We love to watch them.  If Meghan, at 21 years old, asked me to sit down and read a fairy tale to her I would.

Maddie asked to read from a fairy tale compilation that my grandparents gave to her sister, and subsequently her sister passed on to her. Tonight I wanted to read the original Jack the Giant Slayer.  She didn't want to hear that story and insisted on The Elves and the Shoemaker.  Something extraordinary happened as I read the story: a cherished memory of a cherished book swept into me.  I could almost remember the illustrations. I could almost see the cover.  What I could remember was how much I adored that book.  It occurred once the story was refreshed in my mind that I have thought about that particular book many times over the last 35 years or so, but never really consciously enough to look for it.  Tonight I looked for it online.  Tonight I found it.  It will be in my hands again, after some 35 years, by Wednesday afternoon at the latest. 

I wish that book hadn't disappeared when I was a kid. Heck, there are a lot of things I wished hadn't disappeared; however, it's impossible to keep everything, so picking and choosing is important.  There are two schools of thought on cleaning and purging your child's room: involve your child, or do it while they are away.  Which one?
Pretty much, yeah.
The Toss it Method

"Toss it when they aren't there." This is the route taken by most parents.  Wait until the kids are at school, at a parent or grandparent's house, away on vacation.  It seems like the best solution to that messy, overstuffed room. A simple solution.  But is it the best solution?  What happens when the kids come home and find that book they love gone because you think they've outgrown it?  They might not ask you to read it to them any more, but they might love to look at it before bed, unbeknownst to you.
I just can't advocate throwing things or giving things away without your child present.

A Special Note

If at any time your child becomes unusually distressed or agitated (beyond what would be considered normal kid behavior), consider contacting a professional for an assessment.  I am not a licensed anything. These are simply tips that work for me.


The Inclusive Method

Making good decisions involve having your child in the room with you when you clean.  It probably will take three times as long as if you were to blow through like a tornado and toss almost indiscriminately.  Kids move slow, are ambivalent, and lollygag.  That's a fact.  But you are the parent. It's your job to keep your kid on task but keep up a pace. Remember, if you are starting to use more and more space for storage, you need to get rid of stuff. 

"Potential" value

The first thing you need to teach your child is what is garbage and what is not. It seems like a reasonably easy choice for the average person. "I've finished that bottle of soda. Toss the bottle into the recycling bin."  No fuss, no muss.  But sometimes you might have a creative kid who can see "potential" in all things.  They see the spinny wind chime out of the 2 liter soda bottle.  They see the motion ocean of oil and water out of the soda bottle.  They see a mosaic out of bits of torn up construction paper bits.  They see candles in old crayons.  And THIS IS GOOD.  Never extinguish that creativity. But you have to teach your child to consider just how many projects they can do at once or over a short period of time such as a week or a month. I think the best solution to this is to make a chart of the things your child wants to do.  No time table. Just a list.  Your child might want to hold on to that soda bottle.  Say, "well, we can get a soda bottle any time you're ready so we don't have to keep this one. Let's throw this one away because this one is garbage right now."

Unusable:

Teach your child to throw out unusable items.  One half of a pair of flip flops is broken, or one is missing. Throw it out.  It can't be fixed.  One sock is good, one has a hole. Throw the pair out...even if it's a loved pair of socks. They are unusable.  If your child seems attached to them, let them put them on and take a picture of your child in the socks (or a close up of the socks).  A full digital camera is a lot better than a full drawer.

Unsanitary/Dangerous

Teach your child to recognize things that are unhealthy or unsanitary.  Let your child help you clean out the refrigerator.  Point out expiration dates and explain that after an expiration date the food is unsafe and can't be eaten without the possibility of making someone sick. Hand it out and let them throw it out for you. When a child drops a toothbrush on the bathroom floor, tell them to throw it out and use a new one.  While I'm sure you could boil the toothbrush to kill the germs (I'd just a soon throw it out personally), don't let your child get into the habit of rationalizing incorrect decisions.  "I can just boil it and it will be good as new."  "No, honey. It's really dirty now. It goes into your mouth and germs from the bathroom that go into your body can hurt you. We need to get a new clean one." 

Donations

There comes a time when you think it might be time to make some donations.  Instead of throwing things away (that are clearly not garbage and might confuse your child after you explain what garbage is), consider explaining donation. Many kids have too much stuff and many kids don't have enough.  This is a wonderful opportunity to instill some social responsibility in your child. When they no longer play with a toy but still seem reluctant to let it go, ask your child if they think another child that doesn't have toys might play with it more than he does now.

The Box Method

What if the toy or object truly is something your child wants to keep, but she isn't sure.  This is a great tip that even I use when I'm trying to decide if I'm on the fence about giving or throwing something away.  It's the box method.

Find a cardboard box and fill it with the objects.  Make sure your child fills it herself and looks at everything inside.  Make sure what goes in the box is an "on the fence" object.  Seal up the box, designate it "throw away" or "give away,"  put a date on it, and put it somewhere out of the way, a closet, the basement, the attic...a place where it will be forgotten. Start slow.  Go back to the box in six months.  IF and only IF the box has not been opened during that time to find something, toss it out if it is designated garbage or put it right in the car for Goodwill.  Do NOT open the box and look.  If in six months you really don't remember what was in the box, the objects weren't that important. Eventually, you might feel comfortable enough to put it away for a month, or a week.  Use your discretion for your child. Give her a wide berth to start.

This is not a perfect technique. My copy of The Elves and the Shoemaker was in a box in our storage room. I don't know how long it was there.  My step father threw the box away without consulting anyone. Other than that one book, I don't remember any other book that was in that box. This was an almost perfect application, accidentally of course, of the box method.  Yet there was a mistake.  And this will happen.  Be patient and understanding if after the box is removed and given/thrown away, your child looks for something that was inside the box.  I have used the box method for my daughter's room and she's never asked for anything that was put in the box, thrown or given away.

Who exactly is attached?

Oh dear. This happens a lot.  I encourage Maddie to keep things that I'm attached to emotionally.  She wants to throw away a ratty bunny that she hasn't touched in two years. "But that's Honey Bunny! You loved her when you were a baby!"  "But mom...I don't play with it anymore. I haven't in a long time. And it's yucky now."  So...who is hoarding?  You are.  Be choosey what you yourself keep.  It is tempting to keep every single thing that reminds you of your child.  You can't keep everything.  Maybe Honey Bunny is the best thing to keep because it was beloved, but the outfit you loved that no longer fits might not be a good choice. Do not use your child's space to hoard your things by using them as an excuse.  It's hers, not mine, so it belongs in here.

Listen
Always remember to listen to your child. If she says she wants something and is adamant, let her keep it.  Better to be safe than sorry.  If you give your child the tools to make good decisions about possessions, she will begin to be able to make her own choices and recognize which are good and which are bad.  The next clean up might result in an easier time letting go, and less time trying to hold on to things that don't really matter in the long run.  (And yeah, Honey Bunny shouldn't go in the garbage box.)

Some additional suggestions
Here are some additional tools and techniques.  These are designed for people who are having serious difficulty with clutter behavior, but also work well if you keep those questions in mind when you clean with your child.
   
Tools & Techniques

Questions to ask yourself while de-cluttering:

By: Elaine Birchall, MSW RSW, Social Worker, Ottawa Public Health; Coordinator :Ottawa Community Response to Hoarding Coalition, March 2006

Questions About Acquiring

• Do I have an immediate use for it?
• Do I need it? How many do I already have?
• Can I get by without it?
• Do I feel compelled to have it?
• Can I afford it comfortably?
• Do I have time to deal with it appropriately i.e? maintain it?

Questions About Discarding

• Do I need it?
• Do I have a plan to use this?
• Have I used this in the last year?
• Can I get it elsewhere i.e.. the library?
• Do I have enough space for it already clear and available?
• Do I love it?

Questions About How to Organize & Let Go

• Start with one area; spend as many future work periods as needed to complete your goal for this area.

• If entrances, exits or areas near heat and ignition sources for example, (furnaces, stoves, portable heaters, baseboard heaters, water heaters or uncovered light bulbs, are a cluttered, start with them first for safety reasons and continue working in that area until clear. The 1st fire safety priority is clear routes into and out of the residence. The 2nd priority is entrance and exits from each room.
caution: Extension cords should not be used for permanent wiring purposes i.e.. instead of adequate electrical outlets connected to the electrical panel. Make sure smoke detectors are functioning.

• Begin by creating categories for possessions

• Sort into discard, recycle/giveaway & keep piles

• Use questions provided in “Acquiring & Discarding” Sections to decide.

• Continue until chosen area is clear

• Imagine and plan and a more pleasing use for the cleared area


Monday, July 29, 2013

Ridiculously Easy Tomato and Basil Pizza

This is so easy even I can do it...and that's saying a lot.  Cooking is not my forte.

Ingredient List:

1 tube of Pillsbury (or equivalent) pizza dough
3 leaves of fresh basil OR dried basil
1 bag of mozerella cheese
3-4 tomatoes (Roma are nice but any will do)
Pre-heat your oven to 400 degrees


Step One: Cut up basil if fresh.  For those without knife skills or kids, a pizza cutter is the best option.  Cut it as fine as possible.


Step Two: Roll out the dough. It's going to look horrible, I assure you.  Unless you have mad pizza skillz, the dough will roll out square.  Do your best to make it flat and turn up the edges for a crust.  A rolling pin helps to flatten it if you need help.  Fingers work great too.  Imagine all those pizza makers and try to channel them.  Don't throw your dough in the air and try to spin it.  Square doesn't spin well (I speak from experience).


You will never be able to do this with square dough. Never.

Step Three: Slice up your tomatoes and place as many on the dough as you'd like.  These are fresh mini-Roma tomatoes from our garden.  The fact that I can grow tomatoes is a complete fluke.  If I couldn't fresh tomatoes from a grocery store or farmer's market work.


Step Four: Spread all that basil your cut.  Basil is a strong herb when fresh.  Use sparingly if you are concerned about a heavy flavor.  You can dry your fresh basil (or use pre-dried basil) and the flavor won't be as strong.


Step Five: Spread the moz.


Step Six: Bake for about six to ten minutes. Keep watch.  Oven pizzas can go from underdone to brown and burnt in 11.4 seconds flat.


Step Seven: Cool, cut, and eat!  That's it!


Seriously easy.
Bon appetite!

Tuesday, June 18, 2013

Why the Museum is Important

Art enables us to find ourselves and lose ourselves at the same time. ~Thomas Merton

 
Shhh...I took a picture of Maddie and John Schoenherr's Sandworms of Dune, 1977


Our first adventure for the 2013 summer Camp Mommy extravaganza is our local museum. Our museum does its best to get the best exhibits it can and over the last few years has exceeded expectations.  Last year Maddie and I spent our time viewing some of the most incredible science fiction/fantasy paintings ever created.  Included in the exhibit were images and sculptures by H.R. Geiger, one of the paintings upon which the original cover of Dune was based, at least five Tolkien inspired works, and many Boris Viejo pieces.  There was concept art, costumes, and other tremendously large sculptures. Some of them were so life-like I had to stop Maddie (and myself) from touching  (and I’ll tell you a little secret..I snapped a few pictures.  Shhhhh). Though not a part of the science fiction exhibit, the Allentown Art Museum also had a Victorian Mourning exhibit around that time.  Though small in size, the pieces included historic mourning garb, mourning jewelry, hair art, and modern jewelry interpretations of Victorian mourning culture.

This summer The Allentown Art Museum is hosting a collection of the works of Henri de Toulouse-Lautrec.  Not only is this Maddie’s first exposure to the historic fine art of Europe, it’s one of mine as well. I’m glad her first exposure is so early and a painter I love and understand and can translate to Maddie.  The only other major art exhibit I ever saw was Marcel Duchamp when I was about 5 or 6.  I had no idea why there was a toilet inside a museum, and I couldn’t figure out how a big piece of broken glass with bunch of triangles, circles, and lines could be a bride (and I had no idea what bachelors were and why they were making her naked).  I kind of still don’t…and I took a fine arts class in college. 

Wait, what? Marcel Duchamp, Fountain (1917)
 My step-father was an artist who, unfortunately, never took the time to explain to me the art he loved, or help me appreciate what I saw. Perhaps I would have loved Duchamp. All these years later I believe he felt one should simply instinctively understand and be Zen about viewing a piece of art, and while I agree with that fundamentally and am a firm believer that the first emotion you feel in regard to any piece of art is the one you take with you forever, I also believe guidance is necessary, especially for a small child.  Duchamp confused and frustrated me, and though I have learned about him since, and come to appreciate his talent and vision, I will never truly love him, taking those initial feelings of frustration with me as well as the internal “ugh” I hear myself say when someone mentions him. Had my step-father taken the time to crouch down next to me and explain the toilet in the museum (or simply the vision of the conceptual/Dadaism movements) I might have had a very different first experience.

So what does Duchamp mean to me all these years later?  What does it mean for my daughter? I think my younger child’s first exposure to art should be something I can explain. I don’t mean interpret, as that is up to the individual and you must encourage that, but give background information on, and help her understand the vision behind the piece itself.  Either that, or find artwork that we can learn about together.  I have a passion for the Belle Époque and the Fin de siècle so this Toulouse-Lautrec exhibit has me giddy with excitement.  I took a book on Toulouse-Lautrec out from the library and we sat together and looked at his paintings.  She saw a picture of him and asked about his legs. When I told her what happened to him she said, "well, I guess it didn't hurt his painting."  Even there we see a lesson in tolerance and understanding.

You have one activity to do before you go to the museum.  You have to give your child a basic understanding of the idea of different styles.  Several years ago my boyfriend's son came home with a project he did in art class.  Most schools are doing away with art classes unfortunately, so it falls to you to teach appreciation.  Below is a copy of his project.  The best way to do this is to choose eight different painters.  Fold a regular piece of unlined drawing paper so you have eight boxes.  Put the name of one painter in each box.  Show your child one piece of work by that painter, discuss what it looks like, and have your child do a small scale, simple reproduction.  If you discuss Jackson Pollack, have your child use markers of many colors and draw dots all over the inside of the box.  Below is a list of 10 artists and one piece of representative art. You can look up all these pieces on the internet.  Don't worry if your child can't draw a real person if you talk about Rafael...stick figures with wings works!

Aidan B. School art project (about 2010 or so)

Definitions of Artistic Movements
The best online dictionary of artistic movements is found at Art History on About.com.  Most of the definitions here are amalgamates of Art.com and Wiki entries.

Impressionism: 19th century art movement centralized in Paris. Characteristics include relatively small, thin, yet visible brush strokes, open composition, emphasis on accurate depiction of light in its changing qualities (often accentuating the effects of the passage of time), ordinary subject matter, inclusion of movement as a crucial element of human perception and experience, and unusual visual angles.
Post-impressionism: Originated in the early 20th century. Post-Impressionists extended Impressionism while rejecting its limitations: they continued using vivid colours, thick application of paint, distinctive brush strokes, and real-life subject matter, but they were more inclined to emphasize geometric forms, to distort form for expressive effect, and to use unnatural or arbitrary colour. 
 
Pre-Rafaelite: Middle to late 19th century British movement that rejected the mechanical religious works of the Renaissance. These painters returned to the subjects of myth and legend, and rejected art that was seemingly done by rote and convention.

Dadaism: (Ahhh! Marcel Duchamp!)  An artistic moment in the early 20th century that valued nihilism, nonsense, and travesty.  It rejected conventional art.

Cubism: A movement of art that originated in 1907 and is still practiced today. Cubism has several key components: geometricity, a simplication of figures and objects into geometrical components and planes that may or may not add up to the whole figure or object known in the natural world, conceptual reality instead of perceptional reality, distortion of reality, the overlapping of planes, multiple views of the subject matter.  Seems like a difficult concept, but when you view a Picasso,  you'll get it.

Futurism:  From Italy around the same time Cubism was developing. A style of art that embraced mechanism and industrialsim.

Surrealism: Also an early 20th century movement. Surrealism valued the insights and subconscious realities highlighted by Freud.  It included ideas of strong emotions, emotional repression, mystical ideas, ambiguity, and the ideas of chance and spontaneity.

Contemporary: Art from the 1960's or 70's up until this very minute. Contemporary art can involve all previous art styles and most often addresses contemporary issues such as AIDS, poverty, multiculturalism, globalization, and gender issues.  Contemporary art has often been attacked as pointless scribbles that could  have been made by someone's 3 year olds; however, this is not the case.  This kind of art is planned and constructed with vision and the desire to share feelings, images, and ideas just like any other piece of art.


10 Artists and Their Most Famous Works (my opinion anyway!)
Mona Lisa, Leonardo da Vinci, 1509 (Renaissance)

Starry Night, Vincent Van Gogh, 1889 (Post-impressionism)


Number 8, Jackson Pollack, 1949 (Abstract Impressionsim)

The Scream, Edvard Munch, 1893 (Expressionist)
Water Lilies Clouds, Claude Monet, one of 250 Water Lily paintings (Impressionsim)
The Persistence of Memory, Salvador Dali, 1931 (Surrealism)
The Kiss, Gustav Klimt, 1908 (Symbolist)
Two Dancers On the Stage, Edgar Degas, 1874 (Impressionism and Realism)
Girl With a Pearl Earring, Jan Vermeer, 1665 (Baroque)
Woman in a Hat with Pompoms and a Printed Shirt, Pablo Picasso, 1962 (Cubism)

Should I go into "why art is important" or do you know that already?  I think you know that already.  If you believe art is important you must do what you can to make it interesting and fun.  You must do what you can to prevent the eye rolls and sighs when your child has a school trip or is going with you to the museum.  The only way to achieve this is to be excited right along with them, even if you don't like the museum very much yourself.  There are a lot of questions you can ask your child while viewing paintings or sculptures that will increase your child's interaction and instinctual understanding of art.  It might help you as well.  There is nothing more wasteful than going to a museum, viewing works of art, and leaving with no more enlightenment within you than there was when you walked in. The only way to combat that is to TALK about what you see (quietly of course...proper manners in museums is another important lesson). Talk, talk, talk.  Talk at the museum, talk on the way home, talk when you get home.  


Ten Questions to Ask Your Kids About Art
(courtesy of Project Muse)

1. Look carefully at the work of art in front of you. What colors do you see in it? Take turns listing the specific colors that y ou see (for example: "I see red." "I see purple.") 
2. What do you see in the work of art in front of you? Take turns listing the objects that
you see (for example: "I see an apple." "I see a triangle.") 
3. What is going on in this work of art? Take turns mentioning whatever you see happening, no matter how small. 
4. Does anything you have noticed in this work of art so far (for example: colors, objects, or events) remind you of something in your own life? Take turns answering. 
5. Is this work of art true to life? Ho w real has the artist made things look?
6. What ideas and emotions do you think this work of art expresses? 
7. Do you have a sense of how the artist mi ght have felt when he or she made this work of art? Does it make you feel one way or another? 
8. Take a look at the other works of art displayed around this one. Do they look alike? What is similar about the way they look (for example: objects,events, feelings, the way they are made)?
What is different? 
9. What would you have called this work of art if you had made it yourself? Does the title of the work, if there is one, make sense to you? 
10. Think back on your previous observations. What have you discovered from looking at this work of art? Have you learned anything about yourself or others? Now that the game is over, ask your kids again: Do you like this work of art? Why or why not? Has your reaction to the work changed? Do you like it more or less than you did in the beginning? Why?